I started off researching to do an inspiration board and then there was just SO much and so many great things to say about it all... so I'm going to do it as a feature. These pictures come from all over, so make sure you pay attention to the text below the picture that give you a link to the photo's owner. Some of these have great tutorials too!
The 4th of July is so special for many different reasons and it remains one of the few holidays where we gather with our loved ones to celebrate year in and year out. Here are some FABULOUS ideas on how to make that family gathering a little more special this year and bring so many smiles to the faces of those you love! Make sure you look for something special from ME at the bottom of the post!
The 4th of July is so special for many different reasons and it remains one of the few holidays where we gather with our loved ones to celebrate year in and year out. Here are some FABULOUS ideas on how to make that family gathering a little more special this year and bring so many smiles to the faces of those you love! Make sure you look for something special from ME at the bottom of the post!
First up - a stellar invitation!
 Tiny Prints
Who can resist an amazing invitation?! Not me!! I have a massive obsession with printed invites... printed on nice textured paper, with rich colors and that hot-off-the-press smell! Love it!! These are so gorgeous... simple, yet elegant... modern, yet truly traditional (since what holds more tradition than a countries flag?!).
Let's talk about food... well, let's talk about dessert! Who care about the food, when there is sugar to be served, right?! Here are some absolutely awesome dessert ideas for your 4th of July bash!
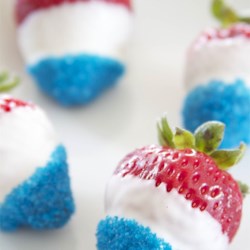 All Recipes
This is just a picture, no recipe, although it is from a recipe site...?? But OK... These would not be terribly hard to make... what would be somewhat difficult is getting them to actually look like THAT - they're kinda like totally perfect! I would imagine much time went into the drying and dipping process. I would say to skewer each strawberry through the stem, but be careful not to disrupt the leaves, since that is part of the beauty. I would dip it 2/3 of the way in white chocolate and then dip 1/3 into the blue sprinkles... but BE CAREFUL! Then, personally... I'd let them dry while holding the skewer... attention to detail is never a bad thing, I promise! Then, I'd probably place the open end of the skewer into some styrofoam to dry more... after the chocolate was set enough to not drip. But, that's just what I'd do! If you set them down too soon, you'll get a mound of chocolate at the base, and while they may taste the same, they will not look the same and what is this without it's amazing clean lines. I'm severely OCD, remember?! :0)
 Cupcakes Kisses 'n' Crumbs
Another amazing way to do chocolate covered strawberries! And look at the detail on the striped ones!! But as much as that detail is SO cute... those totally star covered ones have me DROOLING!! I'm a huge fan of soft and crunchy textures mixed and that looks like total perfection! So cute. Totally love the mix of sophisticated and hip. When my husband saw these he immediately said "Oh!!! Look at THOSE!" Husband approval = HUGE props!
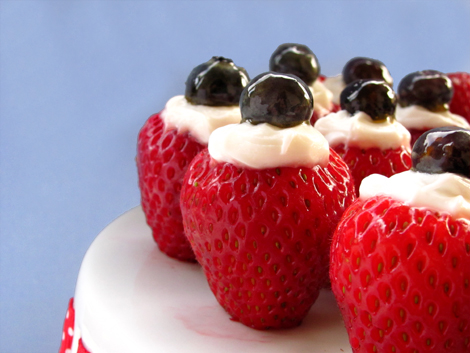
More strawberries... because... well, because, why not?! Strawberries are delish and oh are they beautiful when they are in season. Oh, and they are red, an essential component in a 4th of July party... so, yes... more strawberries! These are sinful looking... and if you read the recipe it gives instructions on how to add some champagne to the cream. Did you hear me?! Strawberries and champagne!! Put the kids to bed... and take these bad boys out of the fridge! I bet they taste even MORE delicious than they look... I sure bet they do...
 Pink Cake Box and Jessicakes
I'm a big believer in gorgeous cakes. Love me some cake... and I also love making cakes. I actually used to make cakes and sell them from my home. When we moved into our new house, our oven could not and would not bake a cake. Now, two years later it is finally calibrated properly and I'm baking again! That makes me a happy girl!! These cakes are gorgeous and would be a perfect addition to your 4th party!
 AndersRuff
 AndersRuff
I am in love with these cupcakes from the original simplicity (white icing) to the pinwheels! What I truly love hits back on the simplicity... I love the white icing with the white cupcake wrapper but the added touch of the printable gives just enough color and pop to make a real statement. And hello?! Who doesn't love pinwheels?! These are also a new HOT TREND in the party world. This picture was my very-hard-to-choose favorite from this AndersRuff feature over at Hostess with the Mostess. And... for a limited time, all of the printables in this feature are 50% OFF in the AndersRuff Etsy shop. Awesome printables collection!!
 Living Locurto
So, Amy over at Living Locurto made these amazing gems of a treat! Aren't they presh?! She made a comment about not being able to serve her children something out of a box so she came up with this... well, Amy! You hit the nail on the head! This is exceptionally semi-homemade. It took her no time at all to make these guys and they look fantabulous! Talk about drab-to-fab in 0 to 60!! I see many, many uses for these in my very near future! Gracias Amy!!
 Velvet Cream Bakery
I found many super cute pictures of cake pops. Know what made me pick these...?? C'mon... you can guess it... I've said it a million times. No, it's not the ribbon, although, that is delightful! What was that? Yep... you got it! The MASON JAR!! I'm obsessed. I bought umpteen hundred of them for Reagan's 3rd birthday and I use them constantly... Love me some Mason Jars!
 Cupcakes Take the Cake
Originally, I was just going to showcase the marshmallows in this picture... which CTTC gives an awesome tutorial with great pictures for. But the rest of these kabobs were just TOO cute to resist! These are too cute for words!!
 Twig & Thistle
Simple. These are perfectly simple. If you've ever made Rice Crispy Treats... then you can make these! And in my opinion... the most important part of this dessert is the ribbon. Anybody can make these treats and tie on a ribbon... it's simple! But oh man, is it gorgeous!!
 Sweets Indeed
Yes folks... those are DONUTS! How insanely creative and heart stopping are THOSE?! The strawberries are coated in maybe a simple sugar, slightly boiled? I can't truly tell... but wow... they look amazing! In fact, the entire post over at Sweets Indeed is absolutely stunning. It is beyond words - check it out!
 Glorious Treats
I don't like Jell-O but I would eat THAT just to be able to say I ate it! Do you see how that can be so bad for my hips?! These are really cute and Glory gives great tips on how to make these. Plus... you have to check out her amazing sugar cookies while you're over there. AH-mazing!!!
Let's move on to drinks...
Let's move on to drinks...
 Be Different, Act Normal via Martha Stewart
Lorie over at Be Different found this amazing picture on Martha Stewart's site, but was unable to find any info for it. So the credit goes to Ms. Martha... but Lorie poses a serious question... with an answer I wouldn't have guessed. What is the star made of? Her answer: jicama. I originally thought it was coconut, but as I don't eat raw coconut and have never even attempted to cut one (I need to remedy that), I am not sure that you can even cut coconut like that?? Anyway... I am in love with that stirrer and that is what matters!
 My Recipes
This recipe is for FRESH Raspberry Lemonade, which in and of itself would make my tastebuds VERY happy! But look at the rims on those glasses... colored sugar!!! AHHH!!! I love making drinks from fresh ingredients, especially fruity drinks. It is such a pleasing and refreshing change from powdered mixes. I believe the stars are made from pineapple but the recipe doesn't say.
Now... on to decor :0)
Now... on to decor :0)
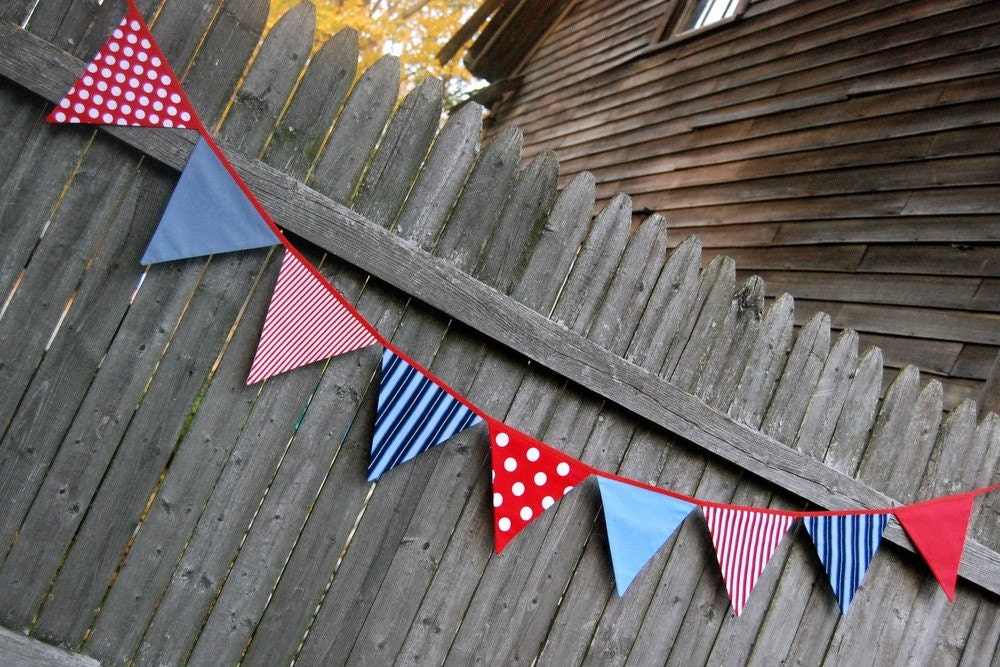 BlueMoon Studios
I am a true believer in bunting and/or banners. I think they add SO much to an event and there are so many ways to use them. They add color and texture and personality and man can they POP when used correctly! There are so many different shapes and textiles you can use and I ♥ ♥ ♥ fabric bunting! These are SO easy to make if you have a sewing machine. And I would bet they are still decently easy if you prefer to hand stitch, although more time consuming. I love the different pattern choices in this particular bunting - polkas to stripes to plain and nice!
 All You
These are adorable! What a great way to display the colors, flags and I love the vases being identical with the exception of size. These are gumballs!!
 Make and Takes
This is another spin on the above idea. I love the simplicity of the first idea, but I love the paper crafting in this picture. Plus, there is a tutorial to make these great "lollies" on the Make and Takes site. You can also make these to place on hats or pins... so cute!!
 Martha Stewart
GORGEOUS! Of course it is straight from Martha herself...!! I love everything about this from the red, white and blue star patterned table cloth to the organza runner and oh, how cute are those napkin holders?! I love set tables... they are perfection!
 {It's A Muegge Life}
And lastly... what 4th of July party could go off without sparklers?!
{It's A Muegge Life}Of course I couldn't do a 4th of July feature without including my very own Tulle Wreath Tutorial! If you've not seen this, check it out! I've provided you with a step-by-step tutorial with helpful hints and even some tips on where to find the supplies! It is so easy, so worth your time and SO stunning!!
And lastly... what 4th of July party could go off without sparklers?!
 Print Your Party
Ahhhhhh!! I've seen these adorable sparkler holders a lot lately, but what better use of sparklers than Independence Day?! These are so cute, and such a great way to display the sparklers... bet you won't forget them this year! By the way... small fact about me... I'm deathly afraid of sparklers, ha! I thought maybe it was just a childhood fear, but last year my cousin had these at her wedding and I tried hard to participate but before they could light mine, I had to hand them off and LEAVE the premise! I have a very severe fear of fire, so I guess this plays into that. So sad because they are really fun and minimally dangerous, ha!
Also, I told you I'd have a surprise for you at the bottom... well, here it is! My very first attempt at subway art!! This will fit any frame up to 8x10. I hope you print it and enjoy it - if you do, send me a picture!! I'd love to see what you do with it!
Also, I told you I'd have a surprise for you at the bottom... well, here it is! My very first attempt at subway art!! This will fit any frame up to 8x10. I hope you print it and enjoy it - if you do, send me a picture!! I'd love to see what you do with it!

Hope you all have a happy 4th! ♥ ♥ ♥